Latest News
-
 4 ways to make your first skydive feel more manageable November 10, 2026
-
 What’s the Scariest Part of Skydiving? How Freefall Feels November 9, 2026
-
 Parental Consent for Skydiving and Young Jumpers November 8, 2026
-
 How to Position Your Body and Breathe During Freefall November 7, 2026
-
 Pressure Changes During Skydiving: Why Your Ears Hurt November 6, 2026
The Arch in Skydiving: Understand the Position and Build Flexibility
October 29, 2026 12:00 amA stable freefall starts with a relaxed, belly-to-earth position. The arch in skydiving is the neutral body shape: hips gently pushed forward, chin raised and eyes looking towards the horizon. It helps you stay steady as you fall without forcing your body into a tense pose.
If the position feels awkward at first, you’re not alone. Holding an arch asks your back and hips to work together, and flexibility can make the shape easier to practise. This guide explains what the arch should feel and look like, why it matters in freefall, and how superman exercises and hip flexor stretches can help you rehearse it on the ground. You’ll also learn how the position differs between tandem and solo skydiving, so you know what to expect before you take to the sky.
Key Takeaways
- Learn how a relaxed, belly-to-earth posture supports a steadier freefall, and which body shape to practise.
- Use superman exercises and hip-flexor stretches to rehearse the position and build flexibility on the ground.
- Spot common habits, such as tensing or tucking your knees, that can make your body less stable in freefall.
- Understand how the arch fits into tandem and solo skydiving, and what to expect from each experience.
What is the Skydiving Arch?
The arch is the neutral body position for belly-to-earth freefall. It gives skydivers a stable starting shape from which to learn control in the air.
Stability and Relaxation in Freefall
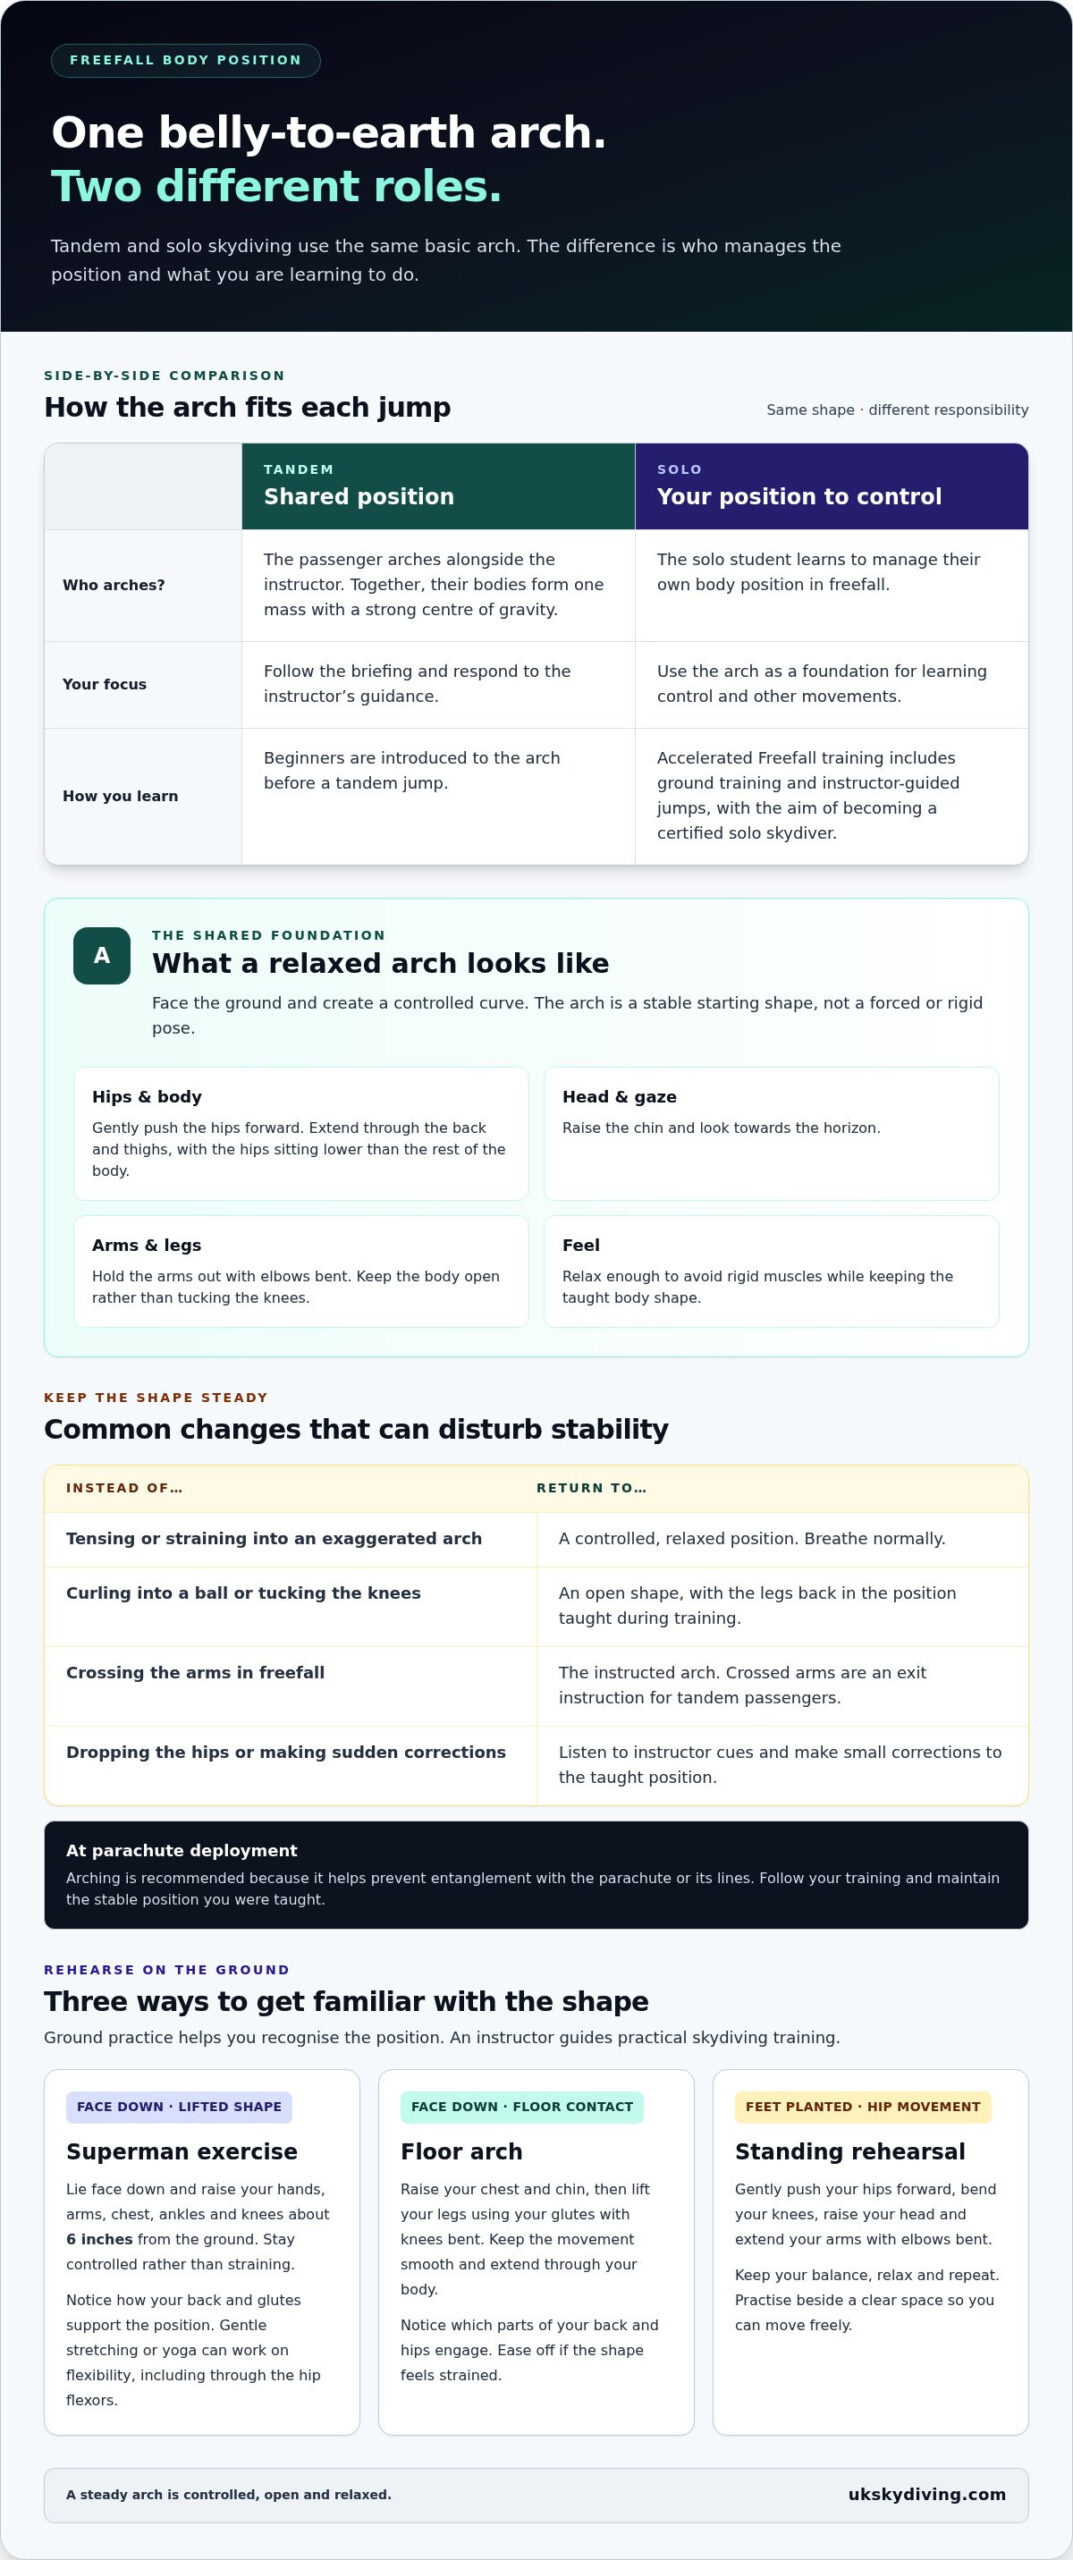
To form the arch, face the ground, gently push your hips forward, extend through your back and thighs, raise your chin and look towards the horizon. Hold your arms out with your elbows bent, and let your hips sit lower than the rest of your body. Relaxing helps you maintain the shape without making your muscles rigid. A steady position can help make freefall more predictable.
Tandem and Solo Arch Positions
The belly-flying arch is used for tandem skydives and when learning to skydive solo. In a tandem jump, the passenger arches alongside the instructor, and their bodies form one mass with a strong centre of gravity. Solo students learn to control their own body position, using the arch as a foundation for other movements. Beginners are introduced to the arch before a tandem jump. Solo training through an Accelerated Freefall course includes ground training and instructor-guided jumps, with the aim of becoming a certified solo skydiver.
Common Arching Mistakes
Common errors include tensing, curling into a ball, crossing the arms or tucking the knees. These changes can disturb stability and lead to erratic movement. De-arching can also make a skydiver less stable, so focus on the position taught during the briefing rather than forcing a deeper bend. Arching is recommended during parachute deployment because it helps prevent entanglement with the parachute or its lines. During freefall, relax and listen to your instructor’s cues.
Practising the arch with superman exercises
Ground practice lets you rehearse the body shape before freefall. Superman exercises, floor arches and standing rehearsals each focus on a different part of the movement.
Superman Exercises for Arch Practice
A superman exercise rehearses the lifted shape of an arch while you lie face down. Raise your hands, arms, chest, ankles and knees about 6 inches from the ground, keeping your body controlled rather than straining. The movement helps you notice how your back and glutes support the position. Add gentle stretching or yoga to work on flexibility, including through the hip flexors. That mobility can make pushing your hips forward feel less restricted. Ground drills help you recognise the shape, but an instructor guides your practical skydiving training towards a licence.
Practising the Arch on the Floor
A floor arch is a simple way to rehearse the position without lifting into a superman shape. Lie face down, raise your chest and chin, then lift your legs using your glutes, with your knees bent. Keep the movement smooth and focus on extending through your body. You can also lift your hands, feet, shoulders and knees while keeping your hips and belly against the floor. Notice which parts of your back and hips engage. If the shape feels strained, ease off rather than forcing a deeper bend.
Practising the Arch While Standing
A standing arch lets you practise the hip movement with your feet planted. Gently push your hips forward, bend your knees, raise your head and extend your arms with elbows bent. Keep your balance as you form the curve, then relax and repeat. This version makes it easier to focus on your hips before adding your chest and shoulders. Practise beside a clear space so you can move freely without bumping into furniture or other obstacles.
Once the ground shape feels familiar, see how it fits into a tandem skydive experience.
What are common mistakes when arching in freefall?
Small changes in body shape can disturb a steady freefall. Common errors include tensing the back, curling into a ball, crossing the arms or tucking the knees. Each changes how the body meets the airflow, which can lead to instability or erratic movement. Notice the change, then return to the position taught during your briefing.
Overarching is not the goal. Forcing your hips too far forward or straining your shoulders can make the shape difficult to hold. Instead, use a controlled arch and breathe normally. If your body feels rigid, soften your arms and legs while maintaining the taught position. Relaxing is different from collapsing: keep your body shape rather than curling inward.
De-arching is another mistake. Dropping your hips or lifting your chest out of position can interrupt stability, especially when you need a predictable shape. During freefall, listen to your instructor’s cues and make small corrections rather than sudden movements. For example, if you notice your knees drawing up, extend them back into the instructed position without abruptly changing your whole body.
- Balling up: unfolding from a tucked position can cause abrupt movement, so keep the shape open.
- Crossing the arms: this is an exit instruction for tandem passengers, not a freefall arch position.
- Tucking the knees: return your legs to the position taught during training.
- Tensing: ease unnecessary stiffness while keeping your body controlled.
Deployment is another reason to follow the taught position. Arching is recommended because it helps reduce the chance of entanglement with the parachute or its lines. The priorities are simple: pull, pull at the predetermined altitude, and pull while stable. These are not interchangeable tasks. Keep the planned altitude and stable body position in mind, and follow your training rather than improvising in freefall.
How do tandem and solo skydiving arch positions differ?
The basic belly-flying arch is used in both tandem skydives and solo training. The body shape is familiar, but the roles differ. In tandem, you share the freefall position with an instructor. In solo skydiving, you learn to manage your own position and build towards other movements.
During a tandem skydive, the passenger and instructor arch together. When both are arched, their bodies form one mass with a strong centre of gravity. Your task is to follow the briefing and respond to the instructor’s guidance. This shared shape helps explain why a passenger practises the arch before the jump, even though the instructor manages the skydive.
Solo training uses the same belly-to-earth foundation, then develops the student’s control of their body position. The arch is the basis for many moves used by licensed skydivers. For example, tracking changes the body into a more pointed shape to move across the sky and create separation from other skydivers. It’s a progression from the neutral arch, not a different version of the tandem position.
Some tandem instructions apply to particular moments, not the whole freefall. On exit, the passenger may be asked to cross their arms over their chest for a clean exit with the instructor. That is distinct from the open arch used in belly-to-earth freefall. Later, during the final approach under the parachute, the passenger lifts their legs by bending 90 degrees at the waist. This landing instruction is also separate from the arch.
Think of the arch as a shared starting position, then listen for the specific cue that matches each stage of the jump. A tandem passenger follows instructions for exit, freefall and landing. A solo student practises the foundational shape before learning additional body positions. Keeping these contexts separate makes each instruction easier to understand.
Ready to experience the tandem position in the sky? Explore a tandem skydive.
UK Skydiving: Tandem Skydive Experience
UK Skydiving’s Tandem Skydive Experience is a natural next step if you want to feel the belly-to-earth position in real freefall. It’s designed for beginners, who are securely harnessed to a professional instructor for a jump from up to 13,000 feet. Before the jump, you’re introduced to the arch and the key positions you’ll use, so you can focus on following your instructor’s guidance as the experience unfolds.
If you’re interested in progressing towards solo skydiving, the Accelerated Freefall (AFF) Course offers a structured training path. The right option depends on whether you want a first skydive alongside an instructor or to work towards solo training. To discuss the Tandem Skydive Experience, contact UK Skydiving.
Take Your Next Step Towards Freefall
Let your ground practice become a moment of focus before the jump. The arch in skydiving is more than a shape to copy. It’s a way to meet freefall with a clear, calm response. Focus on your instructor’s directions and treat each position as part of the experience, not a test of flexibility.
Your next step depends on what you’re looking for. UK Skydiving offers a Tandem Skydive Experience for a first jump, an Accelerated Freefall (AFF) Course for those working towards solo skydiving, and Charity Jumps for fundraising. Each offers a different reason to take to the sky.
If you’re ready to explore your options, contact UK Skydiving to learn more. Take it at your own pace, prepare with confidence and look forward to the moment you leave the ground.
Frequently Asked Questions
How Can I Get The Perfect Arch?
Build a comfortable, repeatable body position rather than chasing a dramatic curve. The arch in skydiving should feel controlled, not painful or forced. On the ground, notice whether you can maintain the shape without holding your breath or tightening every muscle. Use the same simple cues each time, then follow your instructor’s feedback during training. Flexibility can support the movement, but it isn’t a substitute for coached practice.
What is the arch position in skydiving?
It’s the standard belly-to-earth body position used as a reference point during freefall. From this neutral shape, a skydiver can make purposeful adjustments instead of starting from a tucked or twisted posture. Think of it as a baseline for learning body control. In solo training, this baseline helps students understand how later movements change their direction or position relative to other skydivers.
Why do skydivers arch during freefall?
Skydivers arch to give the airflow a predictable body shape to act against. This helps them maintain a controlled position instead of tumbling or making sudden, unintended movements. It also gives a student a clear reference when an instructor demonstrates a correction. The arch matters beyond comfort: controlled movement supports awareness of body position and helps skydivers respond deliberately during freefall.
How do you perform the correct skydiving arch step by step?
Start by facing down and bringing your body into the position taught during your briefing. Then gently press your hips forward, extend through your back, lift your chin and look ahead. Let your arms and legs take the instructed positions without forcing them. Finally, relax unnecessary tension and hold the shape. Practise these cues on the ground, then follow your instructor’s directions during training.
What body position should a beginner use when learning to skydive?
A beginner learns the belly-to-earth arch as the starting position for freefall. In a tandem jump, the passenger follows the instructor’s briefing and cues rather than trying to manage the skydive independently. Someone learning solo develops control of the position through training. The setting differs, but the key is to understand the specific instructions for each stage, including exit, freefall and parachute landing.
How does the arch affect stability and fall rate?
The arch helps stabilise a skydiver by presenting a consistent body shape to the airflow. Changes in posture can alter air resistance, affecting how a person moves through freefall and relative to others. A tucked or uneven shape may also create unwanted movement. For that reason, students learn to maintain a controlled position before practising more deliberate changes in body shape.
Categorised in: Blog