Latest News
-
 4 ways to make your first skydive feel more manageable November 10, 2026
-
 What’s the Scariest Part of Skydiving? How Freefall Feels November 9, 2026
-
 Parental Consent for Skydiving and Young Jumpers November 8, 2026
-
 How to Position Your Body and Breathe During Freefall November 7, 2026
-
 Pressure Changes During Skydiving: Why Your Ears Hurt November 6, 2026
Skydiving Body Position, from Neutral Posture to Backflying
October 24, 2026 12:00 amThe basic skydiving body position is usually called the arch or box position: a belly-to-earth posture that helps you stay stable in freefall. Push your hips forward into the wind, lift your head and legs, and keep your arms and knees balanced. Small limb adjustments can then influence how you move.
Freefall is a rush of air and speed, but posture matters as well as the thrill. How you place your arms and legs, and which way you face, affects stability, movement and orientation. This guide explains the neutral position, head-up, head-down and angled flight, and backflying. You’ll also learn what body position to expect on a first tandem skydive, so the different terms and shapes make sense before you take to the sky.
Key Takeaways
- The belly-to-earth arch is commonly called the box position, and its shape helps create stability in freefall.
- Balanced arm and leg placement gives you a neutral posture, while small adjustments can change your movement.
- Head-up, head-down and angled flight use different orientations, each suited to distinct ways of moving through the air.
- Backflying means descending with your back facing the Earth, rather than your belly.
- For a first tandem jump, practising a short arch and relaxing unnecessary tension can help you prepare for the exit position.
Head-up, head-down and angled flight
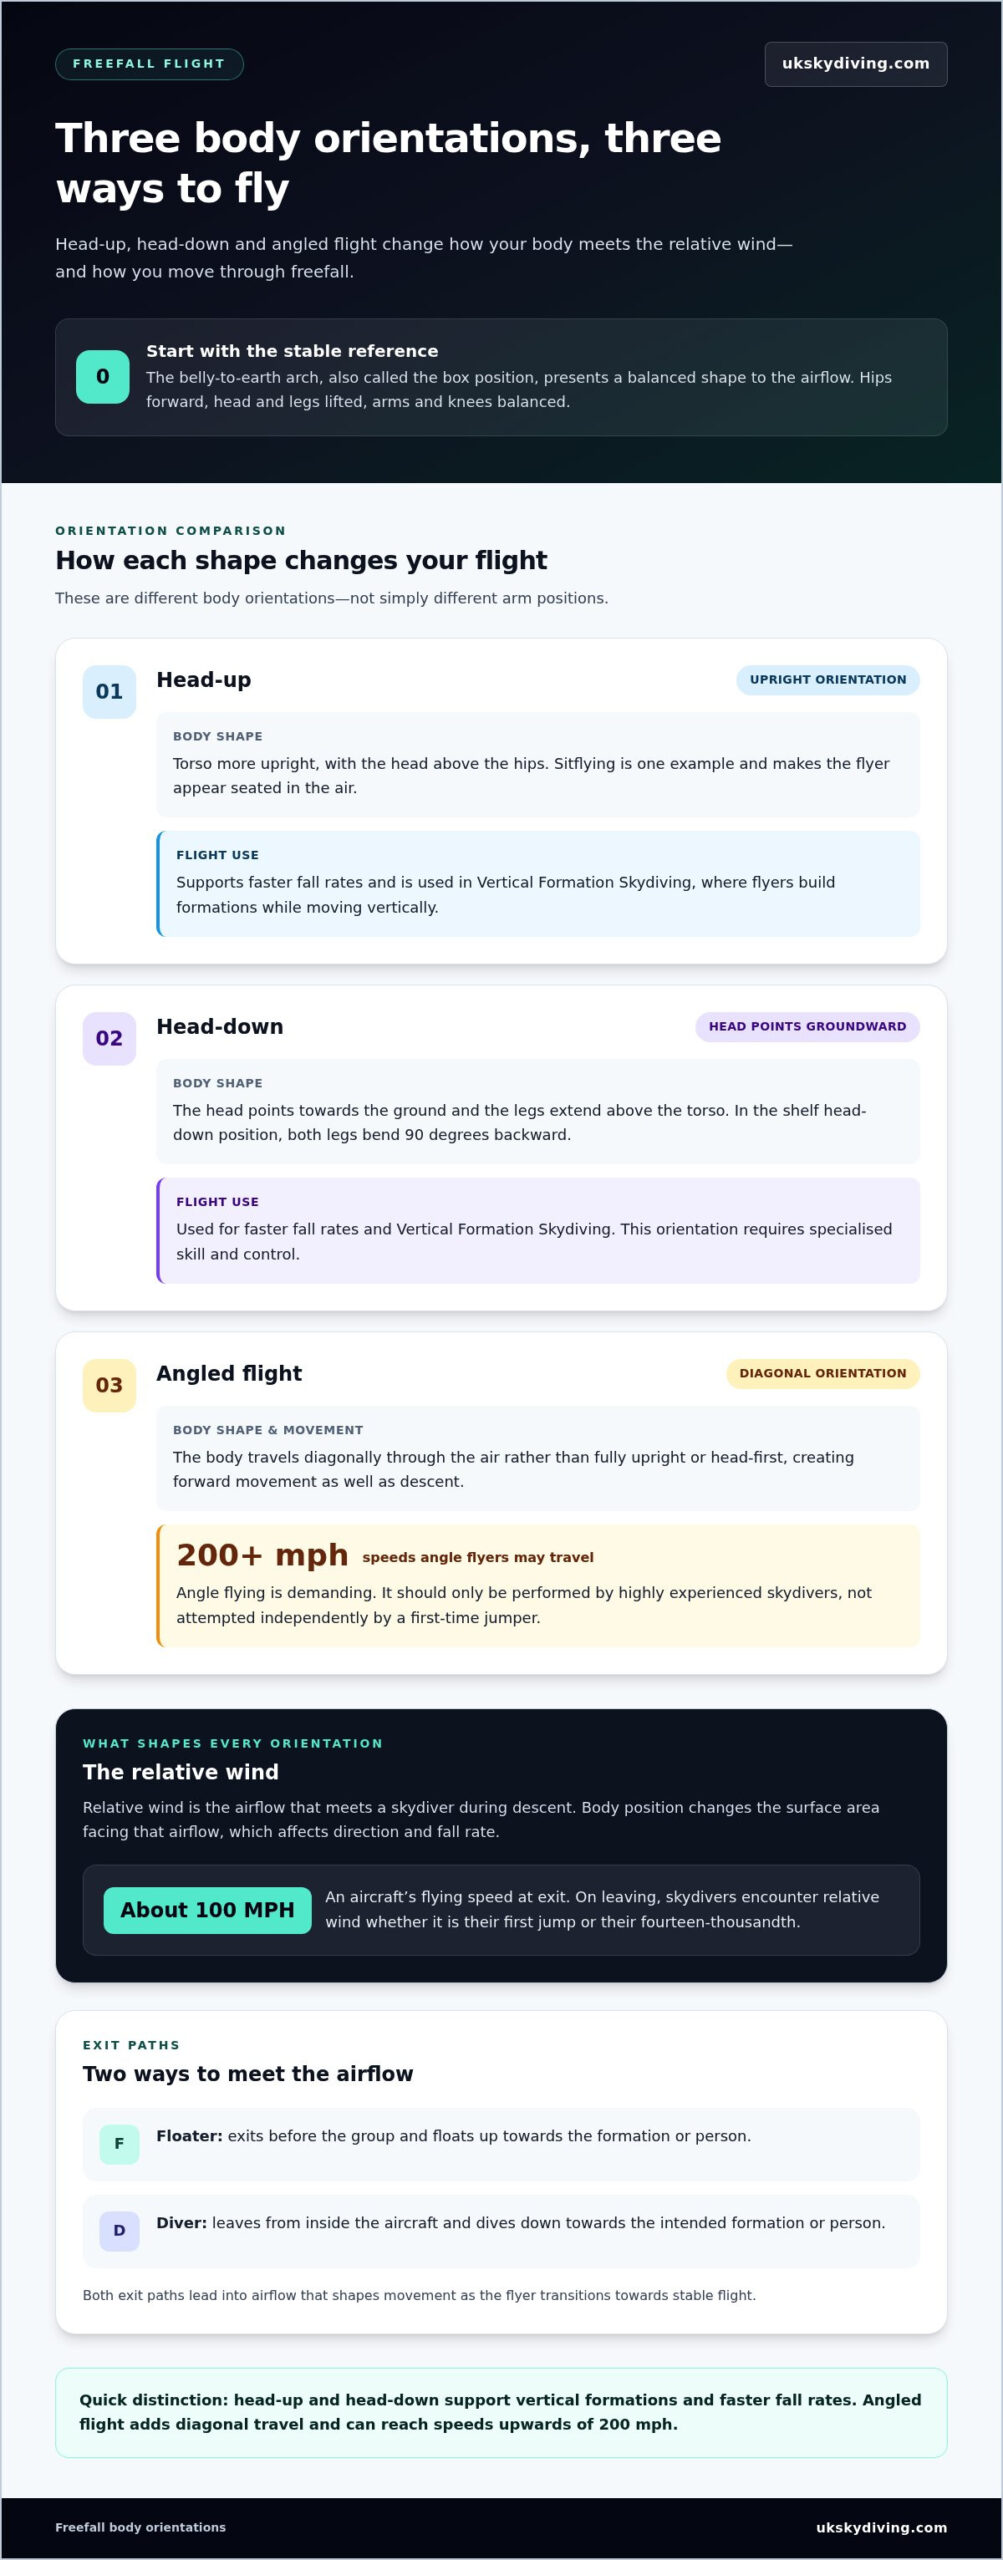
The belly-to-earth arch is just one way to orient your body in freefall. Head-up, head-down and angled flight change how you meet the relative wind, affecting your direction and fall rate. These are distinct body orientations, not simply different arm positions. Each changes the surface area facing the airflow and how your body moves through it.
In head-up flight, your torso is more upright, with your head above your hips. Sitflying is one example, making the flyer appear seated in the air. This orientation supports faster fall rates and is used in Vertical Formation Skydiving, where flyers build formations while moving vertically. The upright shape changes how air flows around the body compared with a belly-to-earth arch.
Head-down flight reverses that orientation. Your head points towards the ground, while your legs extend above your torso. In the shelf head-down position, both legs are bent 90 degrees backward. That recognisable shape helps define the position, but the orientation also affects fall rate. Head-down flying is used for faster fall rates and Vertical Formation Skydiving. It requires specialised skill and control.
Angled flight places the body diagonally through the air, rather than fully upright or head-first. The flyer travels along a sloping path, creating forward movement as well as descent. Angle flyers may travel at speeds upwards of 200 mph. That speed makes the discipline demanding, and only highly experienced skydivers should perform angle flying. It is not a posture for a first-time jumper to attempt independently.
All three orientations depend on the relative wind, the airflow that meets a skydiver during descent. An aircraft’s flying speed at exit is about 100 MPH. On leaving, skydivers encounter relative wind whether it is their first jump or their fourteen-thousandth. A floater exits before the group and floats up towards the formation or person. A diver leaves from inside the aircraft and dives down towards the intended formation or person.
Exit paths connect directly to body orientation. A floater starts outside the aircraft, while a diver approaches from inside, but both meet airflow that shapes their movement. The transition from exit to stable flight depends on how the body meets the wind. Position, orientation and airflow work together to shape the first moments of freefall.
These terms describe different goals in the sky. Head-up and head-down positions support vertical formations and faster fall rates. Angled flight adds diagonal travel, with speeds that can exceed 200 mph. Understanding the names helps you distinguish each discipline, while recognising that advanced orientations require experience beyond basic freefall posture. Each skydiving body position changes the way a flyer presents to the airflow.
How body position controls movement in freefall
In freefall, your body shape affects how the relative wind acts on you. The arch supports stability, while limb adjustments help you steer or change direction.
Tandem and Solo Body Positions
A tandem passenger follows a supported posture while attached to an instructor, while a solo skydiver controls their own position. That difference matters because solo flyers use their arms and legs to manage stability and manoeuvring directly. In the box position, the arms and shoulders form 90-degree angles, with the knees close to 90 degrees. A tandem passenger can focus on the instructed posture rather than managing every movement alone.
First-Time Tandem Position
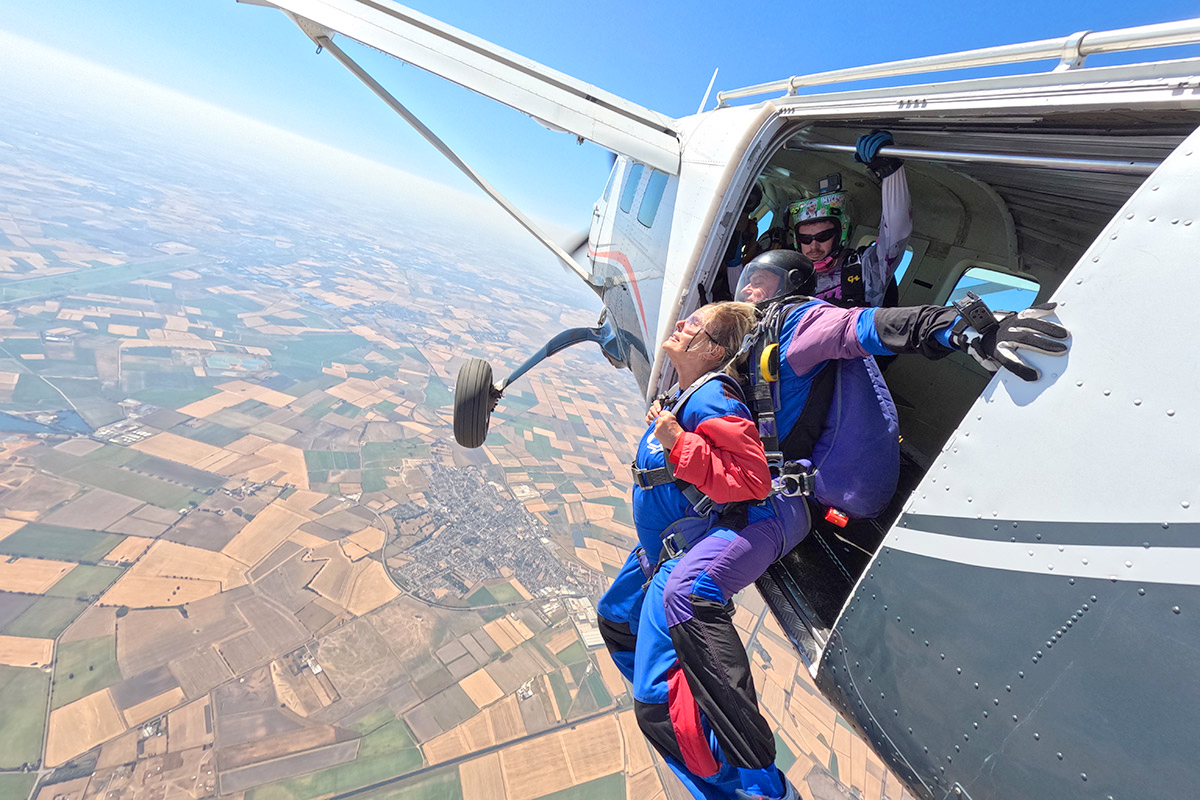
For a first tandem jump, the key shape is an arch, with your hips forward and your head, shoulders and legs lifted. Presenting the lowest part of the arch, around your belly button, to the relative wind helps you meet the airflow during exit. You’re secured to the instructor by a harness, and they guide you through the position. Follow their cues and relax any body parts you don’t need to hold the posture.
Practising the Arch Position
Beginners can practise the arch lying on their belly, with their head and toes pointed upwards and arms held at a 90-degree angle. Push the hips forward and down while lifting the head, shoulders and legs. Start by holding the shape for 5 seconds, then relax. Repeat only while comfortable, without straining. This rehearsal helps you recognise the posture before the aircraft exit, when relative wind first meets your body.
Common Causes of Instability
Uneven arm or leg placement can make the body respond unevenly to the airflow. For example, one leg extended farther than the other can disturb a symmetrical arch. Rigid shoulders, bent wrists or a lowered chin can also change the shape you present to the wind. Relax unnecessary tension, then return to a balanced position with your arms and legs placed evenly.
Small movements matter. In freefall, your arms help with manoeuvrability, while the delta position lets skydivers track away from one another before deploying their parachutes. Changing your arm extension or leg placement alters how your body interacts with the airflow, so deliberate, balanced movements matter more than large, sudden gestures.
The arch helps maintain stability as you descend towards terminal velocity, while controlled limb adjustments support movement. For a first tandem jump, practise the 5-second arch and focus on the instructor’s guidance. If you’re preparing for a tandem skydive, tandem skydiving guidance can help you understand the experience.
Neutral arm and leg positioning
A neutral skydiving body position faces naturally into the wind, with your hips forward and limbs placed evenly. Aim for a balanced shape, not a rigid pose. Matching both sides helps you present a more symmetrical shape to the airflow and spot when one arm or leg is out of position.
Start by pushing your hips forward into the wind. Spread your arms and legs evenly, then bring them into a relaxed, balanced position. Lift your chin to keep your head aligned with the arch. Your body should be engaged enough to hold the shape, without locking your shoulders, elbows or knees.
For the arms, aim to keep each one at about a 90-degree angle. Keep the placement symmetrical, so neither arm reaches noticeably farther forward or sits lower. Imagine your shoulders and arms forming a matching pair of open shapes. If your right arm moves outward while your left stays tucked in, your outline changes from side to side. That difference can affect how the airflow meets you.
For the legs, hold each one at about a 45-degree angle to maintain a symmetrical position. Keep the knees and feet balanced rather than letting one leg stretch away from the other. The arch still matters: hips forward, chin lifted, and head and toes pointed upwards. Together, these cues give your arms and legs a clear reference shape.
- Hips: Push them forward into the wind, rather than letting them drop.
- Arms: Keep each arm near 90 degrees and match their placement.
- Legs: Hold each at about 45 degrees, with the same shape on both sides.
- Head: Lift your chin while keeping the arch engaged.
Use those four cues as a quick mental check: hips, arms, legs, head. For example, if one knee bends more than the other, bring the legs back towards a matched 45-degree shape. If one arm drifts, restore the corresponding 90-degree angle. Small, deliberate corrections help you return to the neutral position without changing your whole posture at once.
Neutral doesn’t mean motionless. During freefall, a flyer may adjust their arms to influence movement and improve manoeuvrability. The neutral shape is a balanced starting point: symmetrical arms and even leg placement give you a reference to return to after each adjustment, while your lifted chin and forward hips maintain the basic arch.
Keep the distinction clear: the 90-degree arm angle and 45-degree leg angles describe a symmetrical reference, not a need to tense every muscle. Relax parts you don’t need to hold the shape. The combination of an even limb position, lifted chin and forward hips creates a practical neutral posture for stable freefall.
Backflying
Backflying means descending with your back facing the Earth. It reverses the familiar belly-to-earth view, with your front facing the sky. The name describes orientation, not just a different arm position. A backflyer still uses their body to interact with the relative wind, but presents a different surface to the airflow than someone holding a belly-down arch.
That change affects what you see and how you interpret movement. In a belly-to-earth position, you can look towards the ground beneath you. In a backfly, the ground is behind your body, changing your view of other skydivers and the horizon. For example, a flyer expecting to see the ground in front may need time to adjust their sense of direction.
Backflying also changes how you relate to nearby flyers. A skydiver facing belly-down and one flying on their back have different orientations, even if they occupy similar space. This contrast matters in a formation, where participants need to recognise each other’s positions and move deliberately. Backflying is more than a visual variation: it changes how a flyer presents their body to the airflow and to other people.
Balance remains central. A backflyer can use their arms and legs to influence manoeuvrability, but uneven placement can make the body respond asymmetrically. For instance, extending one arm farther than the other changes the shape presented to the wind. Measured movements help the flyer notice how each adjustment affects orientation, rather than making several changes at once.
Think of backflying as a distinct orientation, not an automatic extension of the belly-to-earth arch. The familiar arch uses the hips, head and legs to create a belly-down shape. In a backfly, the back faces the Earth. Recognising the difference explains why the same visual cues don’t apply to both positions.
During freefall, the relative wind meets the skydiver as they descend. Changing from a belly-facing to a back-facing position changes which part of the body meets the airflow. A flyer can then use controlled limb movements to work on balance and manoeuvrability. Make one small adjustment, observe the response, then return to a balanced shape before changing position again.
Backflying offers another perspective on freefall. The Earth is behind the flyer, the airflow meets a different body orientation, and nearby skydivers may face another way. These differences help explain how orientation shapes movement and why no single posture describes every way skydivers move through the air.
What is the correct body position for a first-time tandem skydive?
For a first tandem skydive, the key position is an arch, with your hips forward and your head, shoulders and legs lifted. This shape helps you meet the relative wind as you leave the aircraft. You don’t need to make every muscle rigid. Focus on the main posture, then relax the parts you don’t need to hold it.
During the exit, present the lowest part of your arch, around your belly button, to the relative wind. This gives you a simple focus point as the airflow meets you. Keep your chin lifted and gaze forward rather than tucking your head down. You’re harnessed to the instructor, so follow their directions and focus on the position they explain.
A useful preparation step is rehearsing the arch on the ground. Lie on your belly, point your head and toes upwards, and lift your shoulders and legs. Push your hips forward and down. Beginners can practise holding the shape for 5 seconds, then release it. A short, comfortable hold helps you recognise the posture without straining.
Keep your limbs balanced rather than forcing them into a tense pose. In the arch exercise, hold your arms out at a 90-degree angle. Let your knees and feet follow the shape naturally, with both sides positioned evenly. For example, if one leg lifts much higher than the other, adjust towards a more symmetrical posture. Relax parts of your body that aren’t needed to maintain the arch.
At the aircraft exit, focus on one cue at a time. First, remember the arch. Then lift your head and shoulders and keep your hips forward as the relative wind meets you. Use your belly button as the reference point for presenting the lowest part of your arch. This sequence gives you clear actions to remember without trying to control every limb at once.
- Practise: Hold the lying arch for 5 seconds, then relax.
- At exit: Present the belly-button area of your arch to the wind.
- In freefall: Keep your head lifted and release unnecessary tension.
The instructor’s position and directions matter on a tandem jump. You’re securely harnessed to a professional instructor; your role is to follow the taught posture and hold the arch. If a limb feels tense, relax it without dropping your hips or lowering your head. Returning your attention to those two cues helps you maintain the shape.
Ready to experience the view from freefall? Book a tandem skydive and prepare to practise your arch before the jump.
UK Skydiving: Tandem Skydive Experience
UK Skydiving’s Tandem Skydive Experience lets beginners experience freefall securely harnessed to a professional instructor. If you’ve learned the basic arch and want to put it into practice, tandem skydiving offers a guided way to take the leap. Your instructor helps you focus on the position as you experience freefall.
Want to work towards skydiving solo? The Accelerated Freefall (AFF) Course is the next step. Charity Jumps offer another way to take part, while Video and Photo Packages can capture your experience. Each option suits a different goal, from a first jump to learning more about the sport.
Choose the experience that fits your goals, then contact UK Skydiving to take the next step.
Take your next step into the sky
Understanding your skydiving body position gives you a useful starting point. Next, choose how you want to experience the sport. If you’re new to jumping, UK Skydiving’s Tandem Skydive Experience lets you take your first leap with an instructor. If you want to work towards jumping solo, the Accelerated Freefall (AFF) Course offers a route into training. Charity Jumps give your experience a fundraising purpose.
You don’t need to master every freefall position before deciding what appeals to you. Start with the goal that feels right, whether that’s experiencing the rush, developing your skills or jumping for a cause. Contact UK Skydiving to discuss the next step that suits your aims.
Contact UK Skydiving to talk about your skydive and take that first step towards an unforgettable experience.
Frequently Asked Questions
What is the Skydiving Position Called?
The basic skydiving body position is commonly called the arch or box position. In this belly-to-earth orientation, the skydiver faces the ground and the rig points upwards. “Arch” describes the curved posture, while “box” refers to the balanced shape made by the arms and legs. Names change with orientation, so a backfly or head-down position describes a different way of facing the airflow.
What’s A Great Neutral Body Position?
A good neutral position gives you a balanced shape to return to after an adjustment. Check that your arms and legs sit evenly on both sides, rather than letting one limb drift. For example, if your left arm moves outward, bring it back into line with your right. This symmetry gives you a clear reference for noticing how deliberate movements affect your direction.
Why Does A Good Skydiving Exit Matter?
A good exit helps you meet the relative wind in a controlled way, rather than being caught off guard by the airflow. Exit style also shapes your initial path: a floater leaves before the group and moves up towards a formation, while a diver leaves from inside the aircraft and moves down towards it. Matching your exit to the intended formation helps make the transition into freefall more deliberate.
Why do you put your arms out when skydiving?
Your arms help you balance and manoeuvre in freefall. Their position changes the shape your body presents to the airflow, so moving one arm can influence your movement. For example, extending both arms evenly gives you a balanced starting shape, while an uneven adjustment changes that outline. Move deliberately rather than flinging your arms around, then return to a balanced position after the adjustment.
What is the ideal skydiving body position for stable freefall?
The arch is a common starting posture for stable belly-to-earth freefall. Keep your body balanced, with your hips forward and your head and legs lifted. Stability comes from presenting a controlled, even shape to the airflow, not from holding a stiff pose. If one side feels different, compare your arm and leg placement and make a small correction before trying another movement.
How should your arms, legs, hips and head be positioned when skydiving?
For a symmetrical reference, hold each arm at about 90 degrees and each leg at about 45 degrees. Push your hips forward into the wind and lift your chin. Check both sides together: for example, make sure one knee hasn’t moved farther out than the other. These angles describe a balanced position, not a reason to lock your joints or tense every muscle.
What body position should a solo skydiver use when exiting the aircraft?
A solo skydiver commonly uses an arch for a belly-to-earth exit, presenting a balanced shape to the relative wind. The precise movement depends on whether the planned path is a floater or diver exit. A floater leaves before the group, while a diver exits from inside the aircraft. The skydiver’s posture should suit the intended direction and formation.
Can body position affect freefall speed, stability or landing safety?
Yes. Orientation affects fall rate, and a balanced arch helps support stability during freefall. Head-down and sitflying positions are used for faster fall rates than a belly-to-earth position. Freefall posture alone doesn’t determine landing safety. Landing is a separate phase, and a body shape used in the air is no substitute for following the instructions given for the parachute and landing.
Categorised in: Blog